
Roasting a whole pig isn’t as daunting of a task as it might seem if you have never done it before. There is definitely some work and time involved, but it certainly isn’t hard. I’ll explain everything from purchasing to serving so your pig roast can be a day to remember.
Size
When roasting a whole pig you definitely need to consider how large of a pig you are going to need. This is usually based upon the number of people you are going to feed. Rule of thumb is 1 lb per person hanging weight.
If you are going to have a large number of guests (over 120 people) consider getting two smaller pigs, or supplement it with additional meat (pork butt, shoulder, or loin). Smaller weight pigs generally mean they are younger, the meat can be more tender, and your cook time will be less.
Purchasing
Now you need to find a place to purchase your pig. Most butchers, including the one in your local grocery store, can get you one. However, the question is, what will they charge you per pound? I contacted a pig farm to try to get a pig direct from the source, and they ended up being 50% more than the butcher I got it from. So shop around a little, or get a recommendation from someone.
If you live in the Metro Detroit area go to Kaps Wholesale in Eastern Market in Detroit. Everyone there is super friendly, knowledgeable, and helpful. Also, their prices are very reasonable.
The price of meat is like any other commodity and can change regularly. I happened to purchase an 83 lb pig at $1.79/lb.
Also, call ahead to place your order. Some places will require a couple weeks lead time while others may only need a couple of days, so plan ahead in case your butcher requires additional order time.
Ask if you can pick it up fresh and not frozen. Pick it up the day before so you will have time to prepare it.
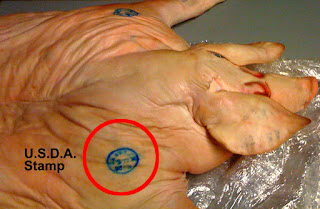
When purchasing a whole pig make sure it is stamped with the USDA seal of approval. To receive the U.S.D.A.'s seal of approval, meat packing facilities must be inspected and maintain sanitation standards.

Whole, Split, or Spit
Determine how you are going to cook your pig. Either you can cook it whole, butterfly it and lay it flat, or you can put it on a rotisserie. The rest of this tutorial will be based upon a butterflied pig.
How to Butterfly
The easiest way to butterfly a pig is to have the butcher you purchase it from do it for you. They will use a bone saw and it will only takes a couple of minutes.
If you are looking for the whole pig roasting experience, you can do it yourself using a sharp axe/hatchet and hammer, or a hack saw/bone saw. Simply cut along the middle of the spine and breast bone, taking care not to split the skin, and it will lay flat.


Preparation
Now the fun begins. Place your pig, on its back, on a large sturdy table. I did a little trimming and clean-up of the pig prior to adding any brine, or rub. The kidneys were still in place so I removed them. They ended up getting thrown away because I was not going to cook them. I also trimmed some of the loose fat to clean it up a little.


It may still be a little bloody, since it is fresh, so take some wet paper towel and wipe it clean.
Next, remove the silver skin, or membrane that is on the ribs. Although this step isn’t necessary, if left on it keeps seasonings and smoke from penetrating the meat. Simply place the back of your knife, or any other dull object, under the membrane, lift and loosen so you can grab it with your fingers, or a paper towel. Now pull the skin off the ribs. It should pull off in a large sheet. If it breaks just use your knife to restart.

Flip your pig over and look for any remaining hair. Although you will receive your pig sans hair there may be a few small spots that were missed. Simply use a disposable razor to remove any hair. In my case I used a propane torch to just burn off the few I found. The last thing you want is for a guest to find a hair in their pork.

Brine and Rub
Some people use marinades and a variety of spices when preparing their pig. I wanted to keep it as simple as possible, but make it taste great. I chose to inject a brine and use a dry rub.
A simple brine is nothing more than a sugar and salt solution in water. Try to find yourself an injector, or a veterinary syringe to inject your brine. Inject your solution in the hams, loins, and shoulders. This will help ensure your meat doesn’t dry out while cooking. I will explain the basics of brining and how it works in a later post.


Now start rubbing. I used my knife and cut the skin away from a portion of the meat to put the rub under the skin so that it would penetrate the meat. Make sure you apply a generous amount of rub all over, especially the underside where the meat is exposed and where you pulled away the silver skin from the ribs.


I added the recipe for the brine and dry rub I used on the Recipe page.
Put it on Ice
Now that you have prepared the pig you need to keep it cool until cooking time so it doesn’t start to spoil.
If you have a large cooler and ice this will work perfectly. However, if you are like me and did not have a cooler large enough to accommodate an 83 pound pig, you can use large heavy duty trash bags.
Use about 20 lbs of ice to ensure your swine stays cool overnight. I wrapped individual, 7 pound, bags of ice in a trash bag to ensure any melting ice would not leak onto the pig and wash any rub away. Place 2-3 bags of ice in the cavity of your pig and fold your pig back over the ice to keep it cool.
Place the pig into a heavy duty trash bag. Depending on the size of your pig this may require two bags. This is where a second person could become useful to help you lift your pig.
After placing it in a trash bag wrap it tight using either tape, or twine. If your pig came in a box from the butcher place it back in the box. This will help act as an insulator.
Keep your pig cool for at least 10-12 hours. Allow time for your brine to work, and break down the proteins in your meat before placing it on the grill.
Game Day
Set your alarm, get up early, and put your game face on because now you are ready to cook. This is the day you are going to score some serious points for all the work you have been doing.
Low and slow is the method you will be using today. So get up early to make sure your pig is cooking, and will be ready to eat shortly after your guests arrive.
First, take your pig off of ice to let it warm up and get closer to ambient temperature before placing it on the grill. Before you fire up your pit put some foil drip pans underneath the area your pig is going to be. I used three pans and put some water in two of them and apple juice in the third. I placed one under the hams, one under the shoulders and one under the ribs and loin section. This not only allows a place for your grease to drip, but the evaporating liquid will help keep your meat moist.
After placing your drip pans, start your charcoal and get your pit up to temperature. Give yourself about 30 minutes to do this.
Instead of placing coals in each corner of the pit I placed them evenly, about 1 foot wide, across the width of the pit at each opening. I then placed a chimney full of coals on top and let it naturally heat up the other coals and slowly burn to each corner.
Once your pit has reached 250 degrees place your pig on the grill, over your drip pans, belly side down, laid flat. Before doing this you may want to wrap the snout and ears in foil. This will prevent them from cooking too fast and burning. Also, if you are planning on placing and apple, or other piece of fruit in the pigs mouth, put a can it the mouth so the mouth will remain open when finished.


Now cover it up and let it cook. If you have a digital probe thermometer you can place it in the hams, or shoulders to monitor the temperature. The goal is to get the temperature to about 185 degrees before taking it off.
Cook Time and Charcoal
Below are two tables showing approximate cook times and the amount of charcoal needed to complete the process.
Pig Weight (Dressed) | Charcoal | Time |
55-80 pounds | 40-70 pounds | 4-5 hours |
85-100 pounds | 70-80 pounds | 5-6 hours |
105-140 pounds | 80-100 pounds | 6-9 hours |
Cook Time (per 10 lbs.) | Temperature |
90 minutes | 225 degrees |
60 minutes | 250 degrees |
45 minutes | 300 degrees |
Environmental factors will play into this equation of temperature and cook time.
The day I roasted a pig it was about 50 degrees outside and very windy. My pit maintained a temperature of about 280 degrees with a couple of unexpected spikes and drops. I used about 50 pounds of charcoal and it took 6 hours for the pig to reach 185 degrees.
Roasting 101
On game day it helps to have your team in place to help you pull all of this off. Have at least one extra set of hands to help you lift and carry, pay attention to your fire, and help you with any other things you may need. Trust me you will need them.
Once your pig is cooking avoid constantly checking on it, and lifting the cover. You will loose heat and just extend cooking time. As long as you can maintain a constant, even temperature there is no need to check on it.
When cooking a butterflied pig the general train of thought is to flip it at some point to cook it evenly on both sides. However, I took a little different approach. I reasoned that if I were to cook a whole, non butterflied, pig that was not on a rotisserie, it would sit on the grill, and indirect heat would eventually cook it all the way through. I wouldn’t have to flip or turn it. Why couldn’t I do the same with a butterflied pig? It will cook faster, but this is what I wanted. Additionally, I wouldn’t have to build any wire cages to sandwich the pig between to flip it. I was going to let indirect heat do its job. And it did to perfection. I didn’t touch the pig for 6 hours and, in my opinion, it turned out great. Here is the caveat to doing it this way. There is the potential for your loin section to cook faster. If you find that your loins are reaching 185 degrees faster than your hams and shoulders you can wrap the middle section of your pig in foil to slow this down.
I previously mentioned that you are going to want to reach a meat temperature of 185 degrees before pulling the pig off the grill. The reason this temperature is crucial is because you want your meat to pull. The collagens, connective tissues, and fats do not melt until 180 degrees. Once this occurs you can now have the beautiful pieces of pulled pork you see in restaurants and on television shows.
Off the Grill
Your pig has reached temperature, and it looks fantastic. Now it has to come off the grill. Because I chose not to create a cage to flip the pig I had to figure out a way to get it off without pulling it apart. We simply took away some block and slid it onto a foil covered table. I happened to have a large pizza peel we used to help move it. Pushing it off from the snout end worked well also. It would probably help to have some type of wire mesh underneath to help lift your pig off the pit.


Now you have to let your pig cool down. You could start cutting into it right away, but I wouldn’t recommend it for the following reasons. First, it’s hot. Second, allow time for the meat to rest, and allow the juices to reabsorb back into the muscles (I will expand on this topic as well in a later posting). Let it rest for about 30-45 minutes. If you have a large cooler you can place it in that is best case scenario. If not you can wrap it in foil and place some towels over it to keep as much of that heat in as possible. The other option is to quarter it up, wrap it in foil and place the smaller pieces in a cooler to rest.


Serving
Your pig has rested, so have you, and now the big moment is here. You get to serve your creation to your anxiously awaiting guests.
There is a couple of ways you can go about serving your pork. First, you can start chopping and pulling the meat, or you can serve it whole and let your guests pick what parts they want directly off the pig.
I chose to do it both ways. Half was cut, chopped and pulled and placed in foil warming trays and served. The other half was left whole and was available for picking.


In each instance, simply cut the skin and peel it back to reveal the meat below. If you are chopping, and pulling, mix all the meat together. You are going to have light and dark meats that when combined will create a great flavor. You can also “chop the brown”, or the skin and incorporate this as well. If your guests are picking simply provide tongs, or forks and let them go at it.
Unless you are planning on cutting directly on a large table, or chopping block, it helps to have some large cutting boards. Use a large chefs knife, or meat cleaver to help you chop. Also, bear claws work great for pulling. I mention some useful tools in the Getting Started page that I will continually update.


Of course you have to provide some sauce. I made three different sauces (Mustard Sauce, Smokey BBQ, and a Vinegar Sauce). I have placed the recipes for each on the Recipe page.
Advice
I received a piece of advice from an award winning pitmaster that I would like to pass along.
Remember that you are putting on a show. If it doesn’t turn out perfect don’t worry about it. Your guests will think it tastes great. You could serve the same meat the following week, and the same people may not like it.
If you think the meat became a little dry you can either pour some juice on it and put it back on the grill for a few minutes, or mix it in some sauce.
Be Flexible
Unfortunately, things may not always go as planned. Instead of stressing over it be flexible. Since your team will be there, all of you will be able to put your heads together and come up with a solution to whatever problem you may be having.
Pig Out
You put in a long day so definitely make sure you take the time to enjoy your pork masterpiece.
If you have any new tricks, or tips you incorporated into your pig roast I would be interested in hearing about them. I would, also, love to hear how the event turned out. Please feel free to email me at CaughtSmokinBBQ@gmail.com.